Building a 3-tier Web Application Architecture with AWS CLI

As we know, a three-tier architecture has three main layers. Presentation layer, application/business layer, and logic layer. The Presentation layer contains the basic user interface, the application/business layer contains business logic, and the logic layer contains data storage or a database. In this article, we are deep diving into how to build a three-tier web application architecture using the AWS CLI. There are two main ways to build a three-tier web application architecture on AWS, such as the AWS management console and the AWS CLI. But here we use the AWS CLI approach, which is the fastest and easiest way for setup and automation. If we use the AWS management console, which is a web-based interface, it will take too much time.
Primary terminology Related to 3 Tier Application Architecture
The following are the some of the primary terminologies related to 3 Tier application architecture:
AWS CLI: It is a powerful command-line interface that helps us interact with AWS services and resources.
VPC: It is a logically isolated section of networking on the AWS cloud.
Security group: It acts like a virtual firewall, which monitors and controls network traffic from the internet.
Subnet: it is a logically isolated segment of VPC. Each subnet has a CIDR block.
Internet gateway: It allows resources in your VPC to connect to the public internet for inbound and outbound traffic.
EC2 instance: It is a virtual compute server that is used to run applications and services.
RDS is a relational database: It service that is famous for complex queries and transactions. And it enables a multi-availability zone.
Route table: It is a set of rules called routes that decides where your traffic will be directed, either through a through a subnet or an internet gateway.
Elastic load balancer: It distributes traffic that comes from the internet and distributes it across multiple instances or targets. Here, the target can be an EC2 instance, containers, etc.
Auto-scaling group: It is a simple set of instances that automatically scale up or down based on traffic or load.
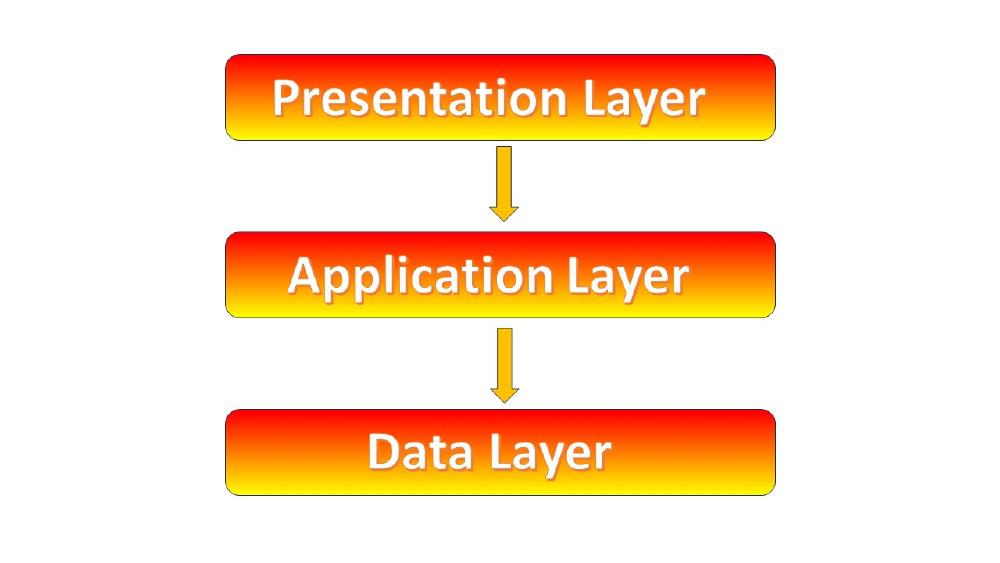
A 3 Tier Web Application Architecture - Overview
In your AWS account, create one VPC (virtual private cloud) in any region. Here, I created it in the Asia-Pacific region (Mumbai). One thing that you know about pricing, Pricing can be varied based on the selection of location or geographical area. For example,
US Regions (Ohio, North Virginia, and Oregon) have cost-effectiveness as compared to other regions.
South America (Sao Paulo) has the highest cost as compared to other regions.
Region pricing factors are,
1. Cost of Infrastructure
Investment in the land
Data center construction and maintenance
If the above price is higher, then you need to pay a high for service in those regions.
2. Demand and Supply
Market demand: Slightly higher pricing due to increased resource utilization and the potential need for additional infrastructure investment.
Supply Availability: If a region has limited resources but competition among customers is very high as compared to what is required for competition, then pricing will be high.
3. Operational Costs
Labor Costs: It will also affect the pricing of services.
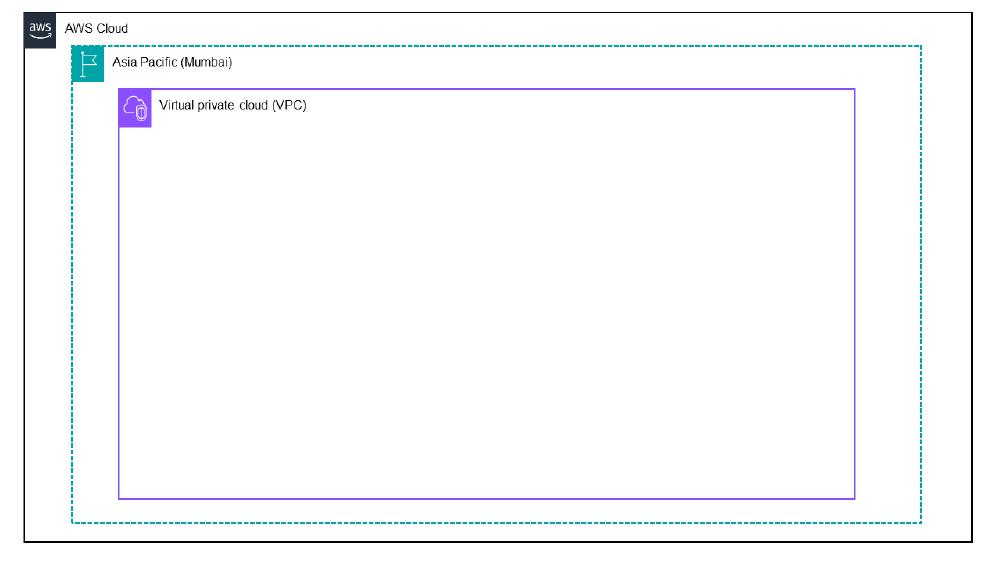
Oncs you created VPC then Creates subnets.
It has main two types,
| Feature | Public Subnet | Private Subnet |
| Internet Connectivity | It is directly connected to the internet gateway. | It is not directly connected with internet gateway. |
| Resource Placement | It contains Web servers, load balancers, internet-facing resources | It contains Application servers, databases, internal resources |
| Security | It Requires careful security group configuration | It Offers higher security by default |
| Route Table | Route to internet gateway (0.0.0.0/0 -> igw-id) | May or may not have route to internet gateway, might have route to NAT gateway |
Here in this VPC we create subnets in two different availability zone.
ap-south-1a Availability zone has main three subnets, In that one public subnet and two private subnets.
ap-south-1b Availability zone has main three subnets, In that one public subnet and two private subnets.
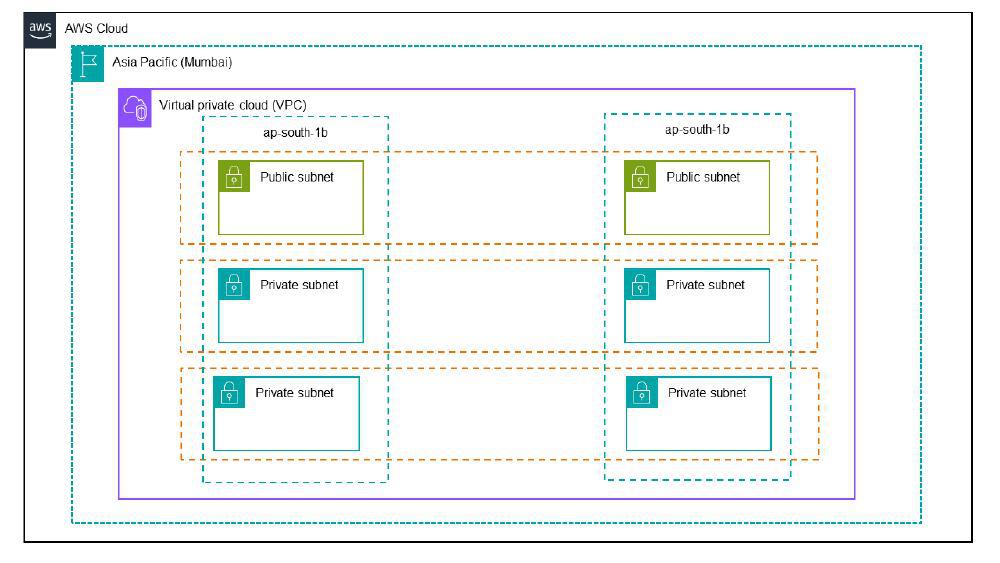
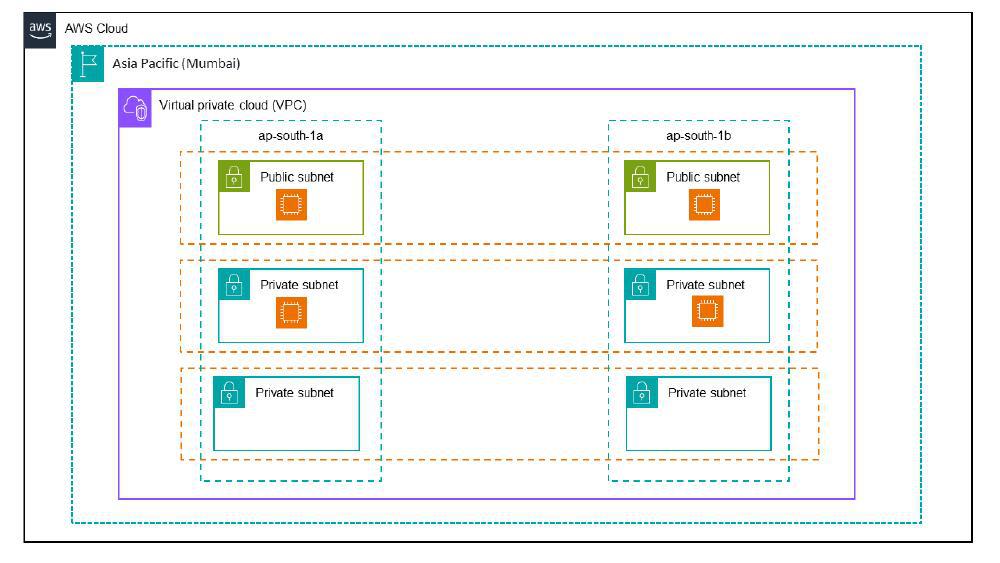
Here in the below diagram (Figure 1.3), it simply shows that we are creating four EC2 instances, with two uploading on the public subnet and the other two on the private subnet.
Public subnets contain Web servers.
Private subnets contain application servers.
Now we are attaching an Internet gateway to our VPC and adding two databases on different private subnets.
Which cannot be directly accessed by a public IP address but only communicates with the application server.
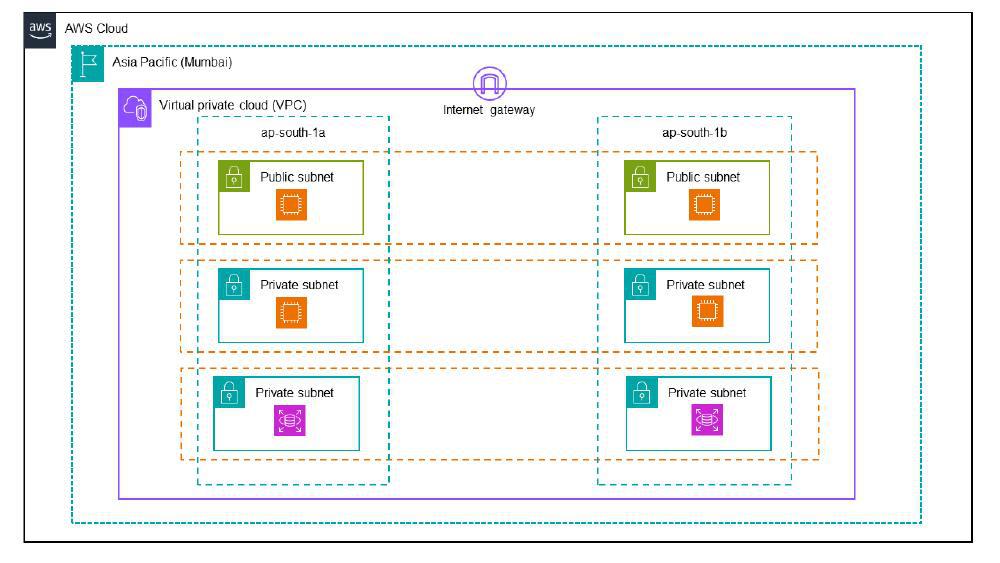
Now we are adding Route table between two subnets that are in the different availability zones.
One Public route table
Two Private route table
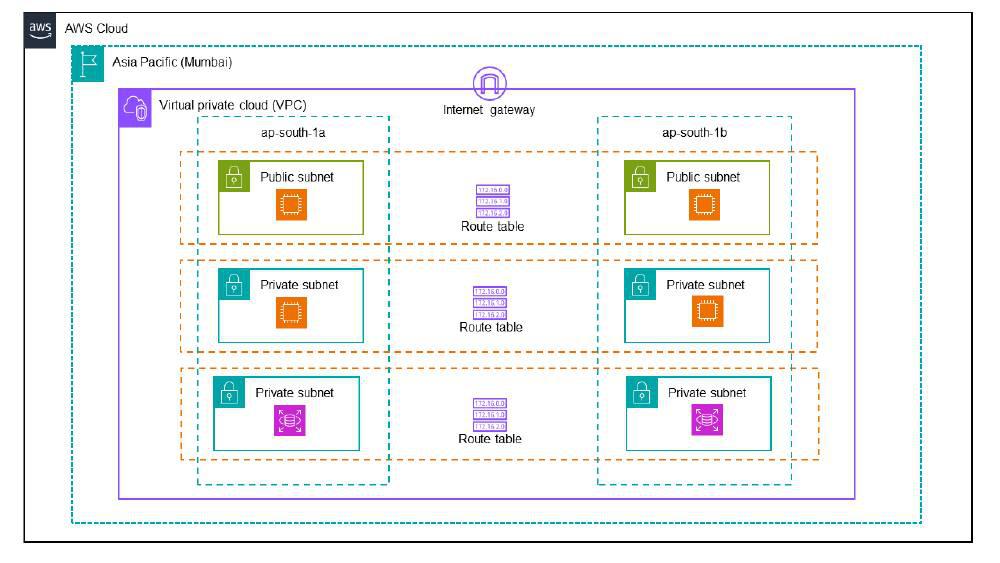
Each subnets layers contains one security groups.
Web security group
App security group
Database security group
Here first and second layer contains the load balancer for distribution of the traffic.
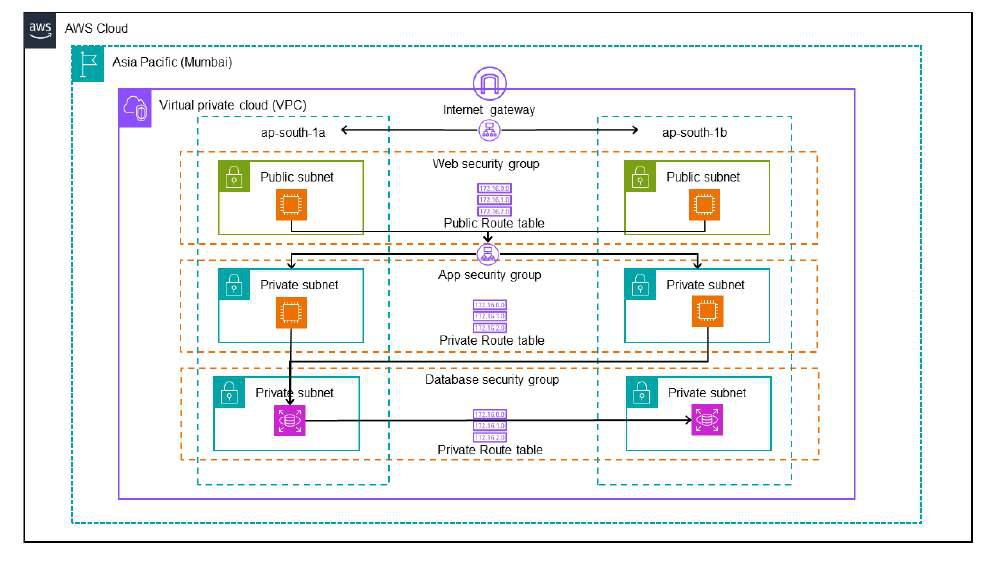
Here we added security groups in the First and second layer
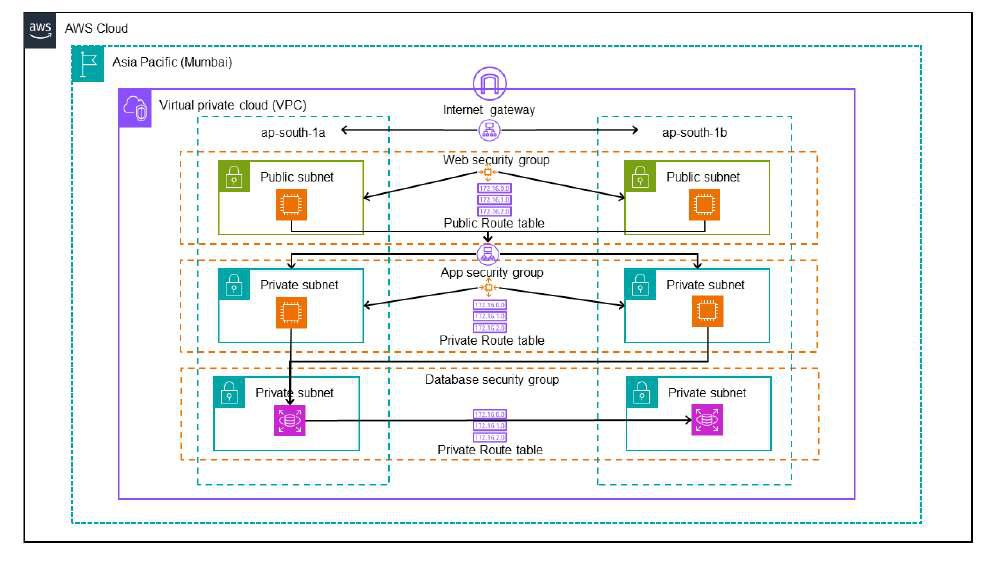
- Here is the short demonstration on the workflow of 3 Tier Application Architecture:
Solution Overview
Here entire process is divided into three segments:
1. Network Layer Setup
Step 1: Configuring AWS CLI
step 2: Creating a VPC and Internet Gateway and Attach to VPC
Step 4: Creating Route Table for Public Subnet an
Step 3: Creating Internd AssociateStep 5: Modifying Subnet Attributes to Enable Public IP
Step 6: Creating Security Groups
Step 7: Configuring Security Group Rules
Step 8: Load Balancer and Auto Scaling Setup
Step 9: Creating Launch Template
Step 10: Creating Auto Scaling Group
2. Application Layer Setup
Step 1: Launching EC2 instances
Step 2: Load Balancer and Auto Scaling Setup
Step 3: Creating Launch Template
Step 4: Creating Auto Scaling Group
3. Data Layer Setup
Step 1: Creating database subnet group
Step 2: Launching RDS instance
Building a 3-Tier Web Application with AWS CLI: A Step-By-Step Guide
The following are the steps that guides in building a 3 tier web application architecture from AWS CLI:
Step 1: Configuring AWS CLI
Install AWS CLI: Follow the instructions from the AWS CLI documentation for installing AWS CLI as per your operating system.
Configure AWS CLI: After Installing AWS CLI you configure your AWS CLI through following command.
aws configure

After that you enter some necessary information such as,
Your AWS access key,
Secret key,
Region, and output format.
Note: Whenever we are writing any variable at that time we start like, Variable_name = $(aws ec2 create...).
❖ Network Layer Setup
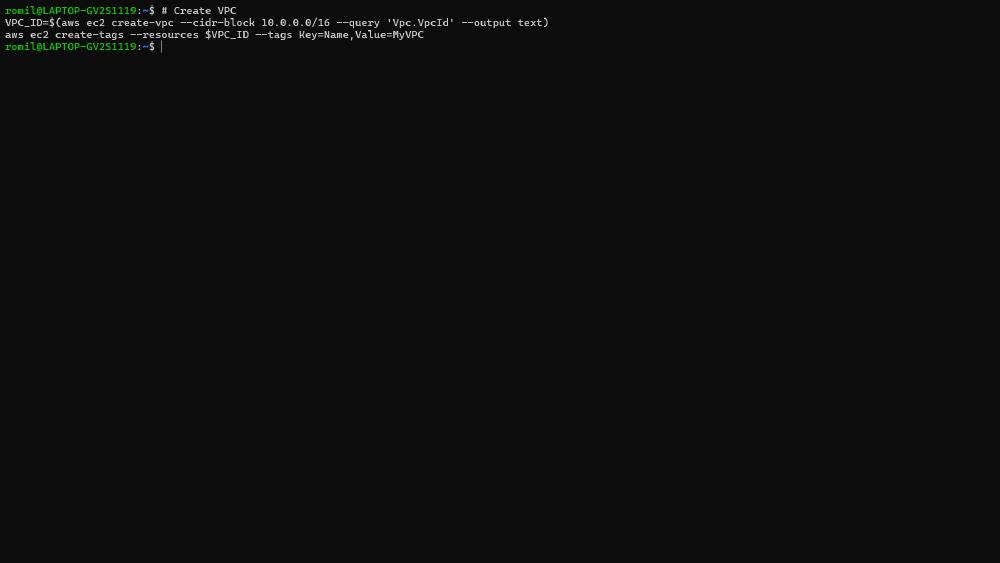
Step 1: Creating a VPC
VPC_ID=$(aws ec2 create-vpc --cidr-block 10.0.0.0/16 --query 'Vpc.VpcId' --output text)
aws ec2 create-tags --resources $VPC_ID --tags Key=Name,Value=MyVPC
- Here we are creating VPC with MyVPC name and their cidr range is 10.0.0.0/16 means 16 bit network mask.
VPC_ID is a variable.
Step 2: Creating Subnets
# Create Public Subnets
PUBLIC_SUBNET_ID_1=$(aws ec2 create-subnet --vpc-id $VPC_ID --cidr-block 10.0.1.0/24 --availability-zone ap-south-2a --query 'Subnet.SubnetId' --output text)
aws ec2 create-tags --resources $PUBLIC_SUBNET_ID_1 --tags Key=Name,Value=PublicSubnet-1a

PUBLIC_SUBNET_ID_2=$(aws ec2 create-subnet --vpc-id $VPC_ID --cidr-block 10.0.2.0/24 --availability-zone ap-south-2b --query 'Subnet.SubnetId' --output text)
aws ec2 create-tags --resources $PUBLIC_SUBNET_ID_2 --tags Key=Name,Value=PublicSubnet-1b
Here we are creating public subnet in the first availability zone with PublicSubnet-1a name and their cidr range is 10.0.1.0/24 means 24 bit network mask.
And second public subnet in the second availability zone with PublicSubnet-1b name and their cidr range is 10.0.2.0/24 means 24 bit network mask.
PUBLIC_SUBNET_ID_1 is a variable.
PUBLIC_SUBNET_ID_2 is also second subnet variable.
# Create Private Subnets for App Servers
PRIVATE_APP_SUBNET_ID_1=$(aws ec2 create-subnet --vpc-id $VPC_ID --cidr-block 10.0.3.0/24 --availability-zone ap-south-1a --query 'Subnet.SubnetId' --output text)
aws ec2 create-tags --resources $PRIVATE_APP_SUBNET_ID_1 --tags Key=Name,Value=AppSubnet-1a

PRIVATE_APP_SUBNET_ID_2=$(aws ec2 create-subnet --vpc-id $VPC_ID --cidr-block 10.0.4.0/24 --availability-zone ap-south-1b --query 'Subnet.SubnetId' --output text)
aws ec2 create-tags --resources $PRIVATE_APP_SUBNET_ID_2 --tags Key=Name,Value=AppSubnet-1b
Here we are creating private App subnet in the first availability zone with AppSubnet-1a name and their cidr range is 10.0.3.0/24 means 24 bit network mask.
And second private App subnet in the second availability zone with AppSubnet-1b name and their cidr range is 10.0.4.0/24 means 24 bit network mask.
PRIVATE_APP_SUBNET_ID_1 is a variable.
PRIVATE_APP_SUBNET_ID_2 is also second subnet variable.
# Create Private Subnets for Database
PRIVATE_DB_SUBNET_ID_1=$(aws ec2 create-subnet --vpc-id $VPC_ID --cidr-block 10.0.5.0/24 --availability-zone ap-south-1a --query 'Subnet.SubnetId' --output text)
aws ec2 create-tags --resources $PRIVATE_DB_SUBNET_ID_1 --tags Key=Name,Value=DbSubnet-1a

PRIVATE_DB_SUBNET_ID_2=$(aws ec2 create-subnet --vpc-id $VPC_ID --cidr-block 10.0.6.0/24 --availability-zone ap-south-1b --query 'Subnet.SubnetId' --output text)
aws ec2 create-tags --resources $PRIVATE_DB_SUBNET_ID_2 --tags Key=Name,Value=DbSubnet-1b
Here we are creating private Database subnet in the first availability zone with AppSubnet-1a name and their cidr range is 10.0.5.0/24 means 24 bit network mask.
And second private Database subnet in the second availability zone with AppSubnet-1b name and their cidr range is 10.0.6.0/24 means 24 bit network mask.
PRIVATE_DB_SUBNET_ID_1 is a variable.
PRIVATE_DB_SUBNET_ID_2 is also second subnet variable.
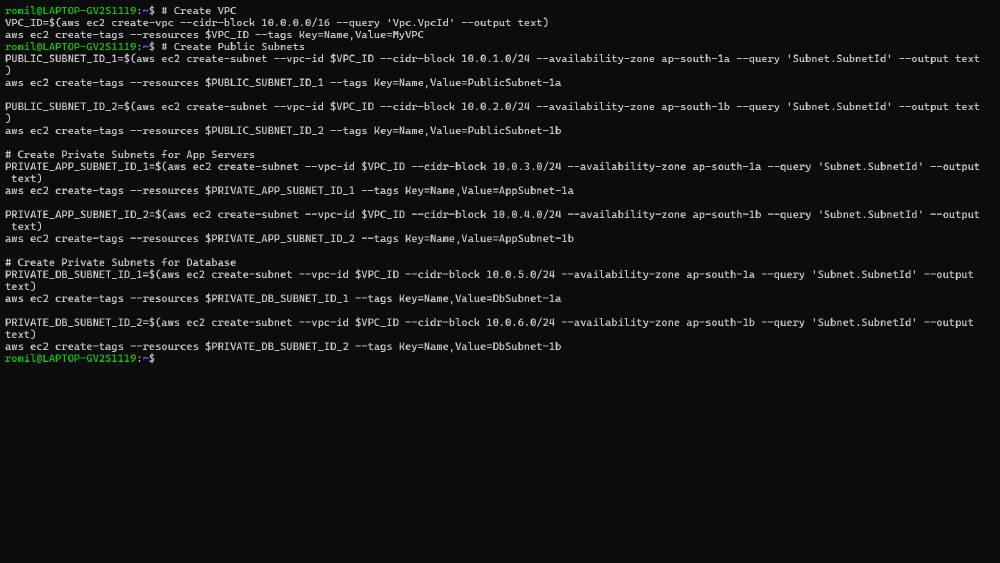
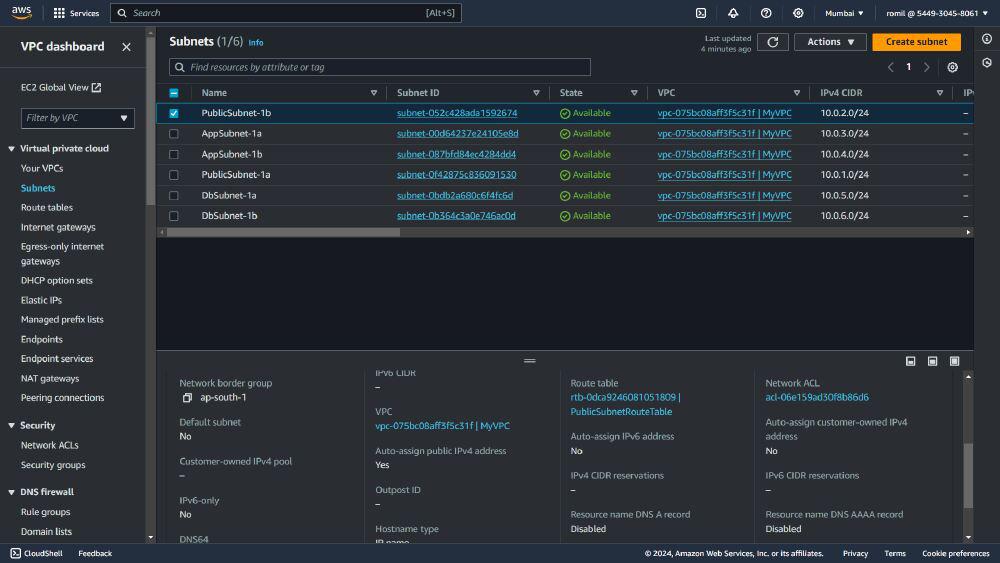
- The following screenshot the successful creation of VPC:
Step 3: Creating Internet Gateway and Attach to VPC
# Create Internet Gateway and Attach to VPC
IGW_ID=$(aws ec2 create-internet-gateway --query 'InternetGateway.InternetGatewayId' --output text)
aws ec2 attach-internet-gateway --vpc-id $VPC_ID --internet-gateway-id $IGW_ID
aws ec2 create-tags --resources $IGW_ID --tags Key=Name, Value=InternetGateway
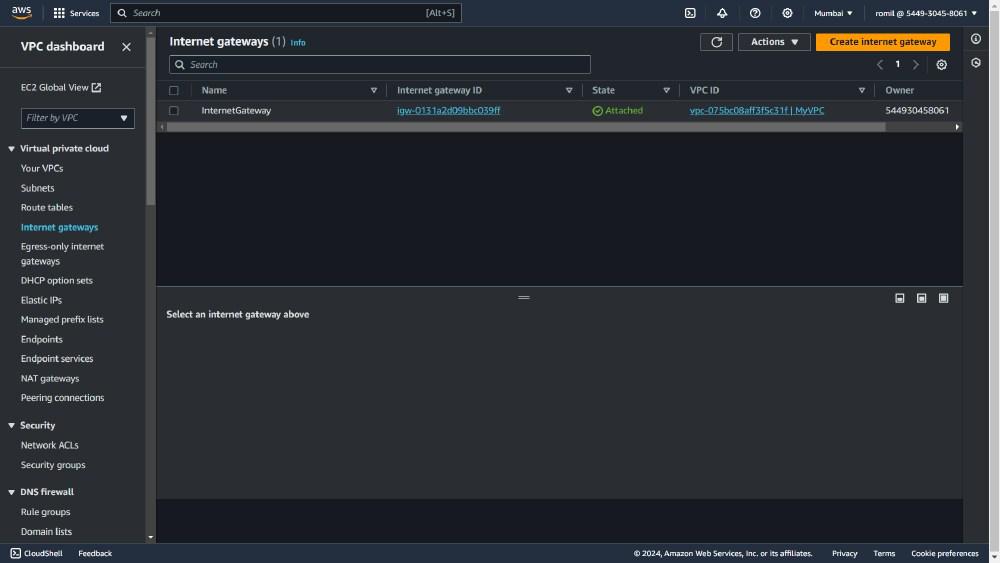
First we are Creating Internet Gateway and attaching with VPC.
Here --query 'InternetGateway.InternetGatewayId' is filtering the output of the create-internet-gateway command.
Here --output text that instructs the AWS CLI to output format should be in the plain text.
As we know that by default format is JSON or YAML.
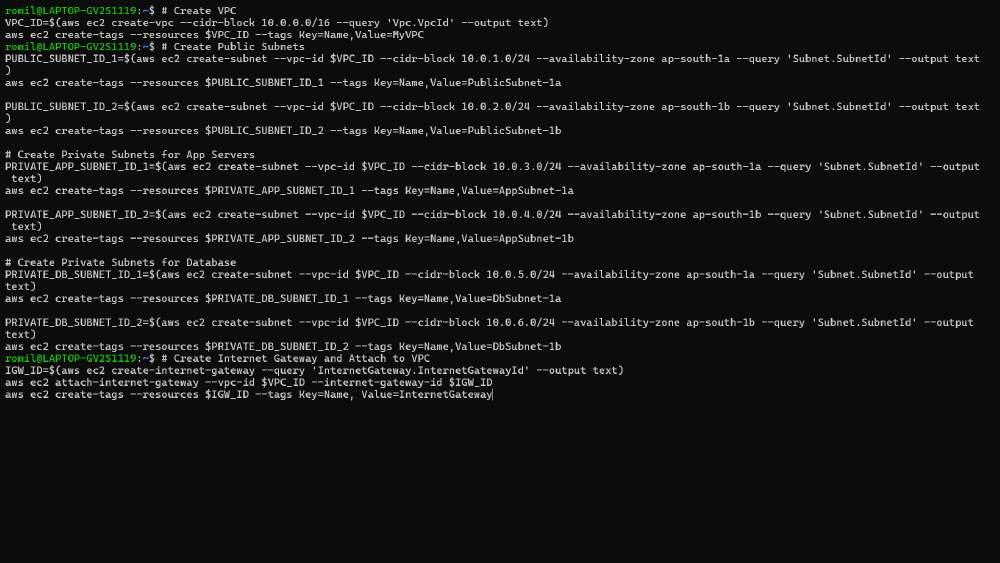
- The following screenshot illustrates on successful creation of Internet Gateway:
Step 4: Creating Route Table for Public Subnet and Associate
# Create Route Table for Public Subnet and Associate
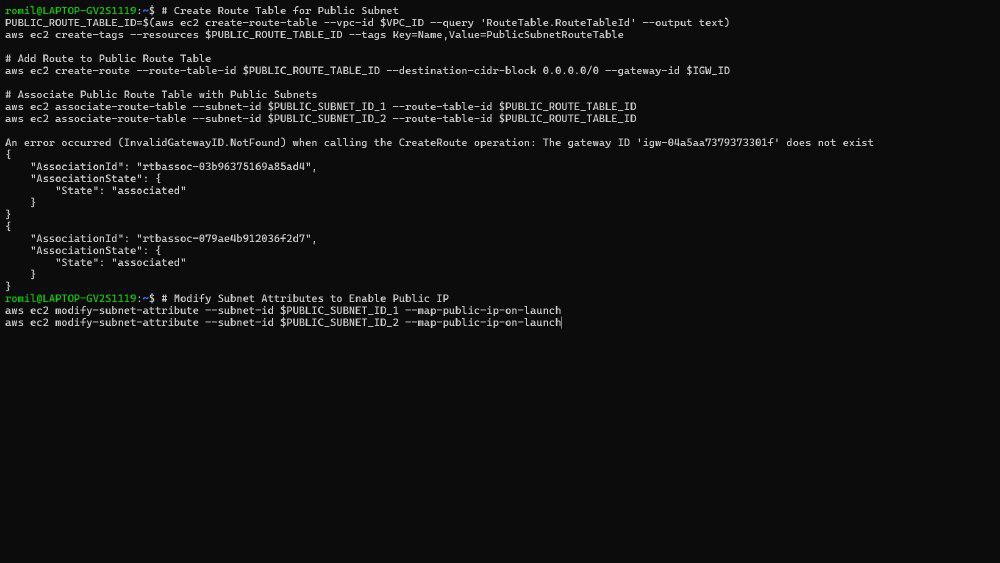
PUBLIC_ROUTE_TABLE_ID=$(aws ec2 create-route-table --vpc-id $VPC_ID --query 'RouteTable.RouteTableId' --output text)
aws ec2 create-route --route-table-id $PUBLIC_ROUTE_TABLE_ID --destination-cidr-block 0.0.0.0/0 --gateway-id $IGW_ID
aws ec2 associate-route-table --subnet-id $PUBLIC_SUBNET_ID_1 --route-table-id $PUBLIC_ROUTE_TABLE_ID
aws ec2 associate-route-table --subnet-id $PUBLIC_SUBNET_ID_2 --route-table-id $PUBLIC_ROUTE_TABLE_ID
Here --query 'RouteTable.RouteTableId' is filtering the output of the create-route-table command. and in a simple way we say that it instructs the AWS CLI to look into the RouteTable object which contains the RouteTableId(unique ID).
Here --output text that instructs the AWS CLI to output format should be in the plain text.
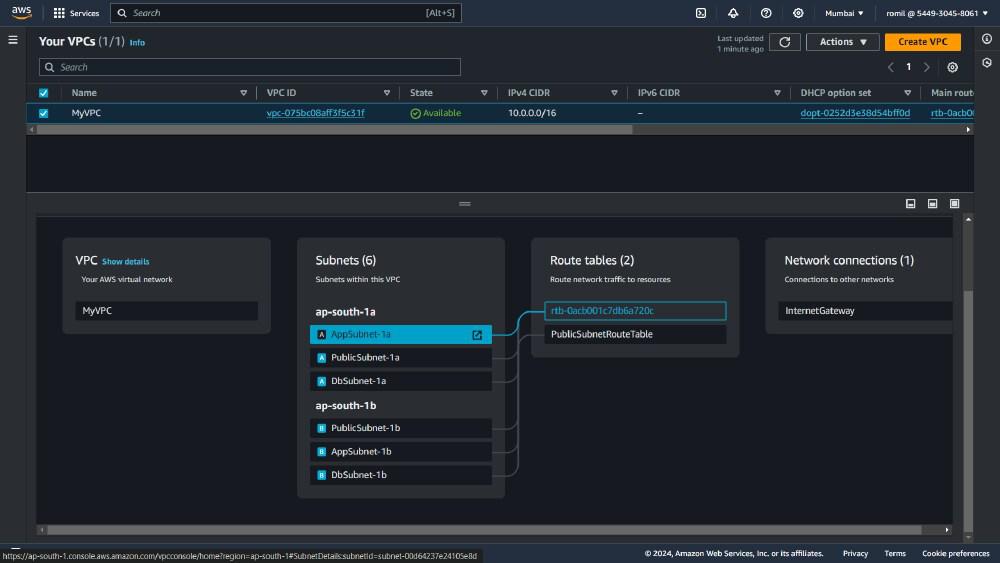
The following screenhot illustrates on successful creation of customized vpc:
Step 5: Modifying Subnet Attributes to Enable Public IP
# Modify Subnet Attributes to Enable Public IP
aws ec2 modify-subnet-attribute --subnet-id $PUBLIC_SUBNET_ID_1 --map-public-ip-on-launch
aws ec2 modify-subnet-attribute --subnet-id $PUBLIC_SUBNET_ID_2 --map-public-ip-on-launch
- After creation of subnets we are modifying public subnets for enabling public-IP.
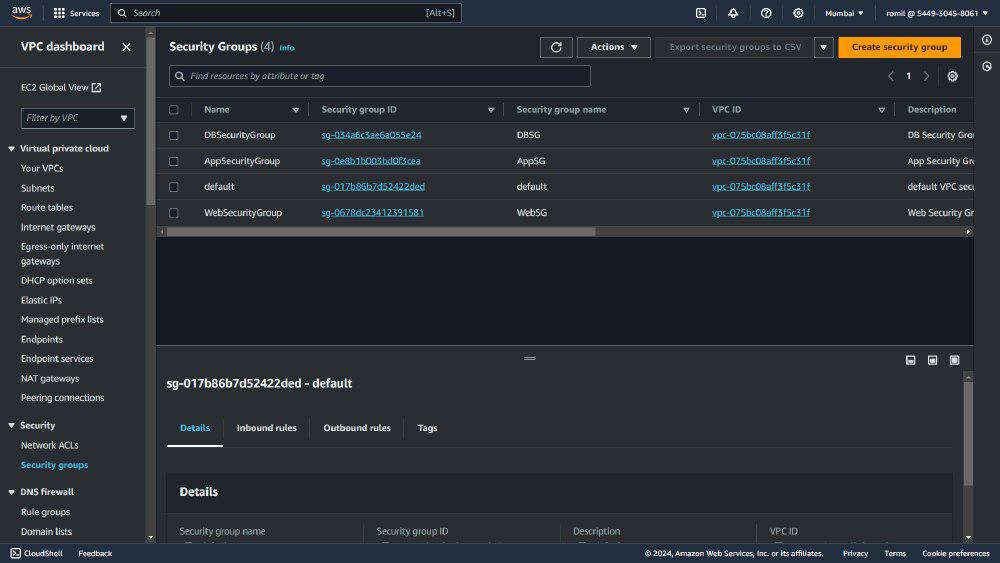
Step 6: Creating Security Groups
# Create Security Groups
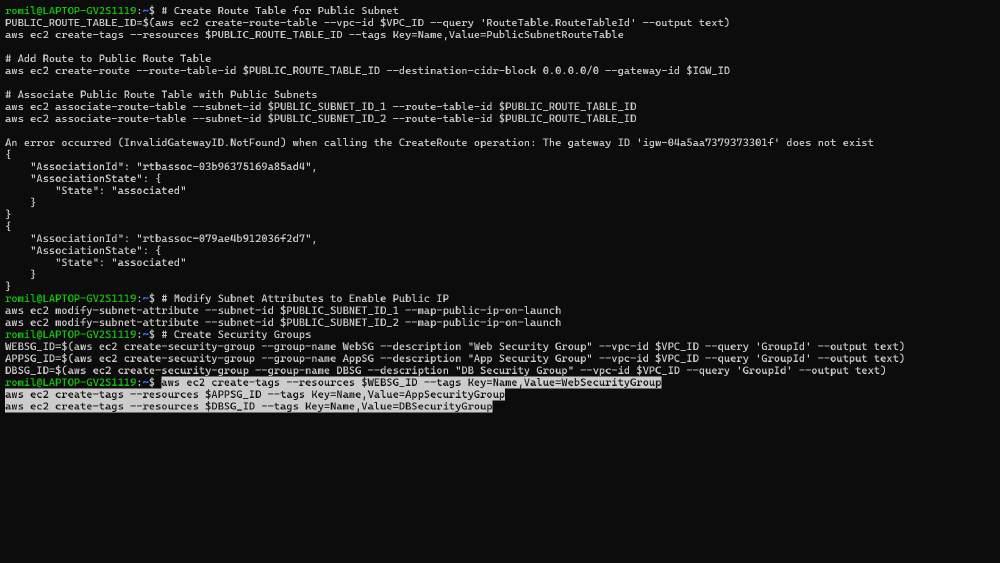
WEBSG_ID=$(aws ec2 create-security-group --group-name WebSG --description "Web Security Group" --vpc-id $VPC_ID --query 'GroupId' --output text)
aws ec2 create-tags --resources $WEBSG_ID --tags Key=Name,Value=WebSecurityGroup

APPSG_ID=$(aws ec2 create-security-group --group-name AppSG --description "App Security Group" --vpc-id $VPC_ID --query 'GroupId' --output text)
aws ec2 create-tags --resources $APPSG_ID --tags Key=Name,Value=AppSecurityGroup

DBSG_ID=$(aws ec2 create-security-group --group-name DBSG --description "DB Security Group" --vpc-id $VPC_ID --query 'GroupId' --output text)
aws ec2 create-tags --resources $DBSG_ID --tags Key=Name,Value=DBSecurityGroup
As we discuss the primary terminology, Security groups are act like virtual firewall. Here security groups contains main 4 key points
--group-name
--description
--vpc-id
--query
--output
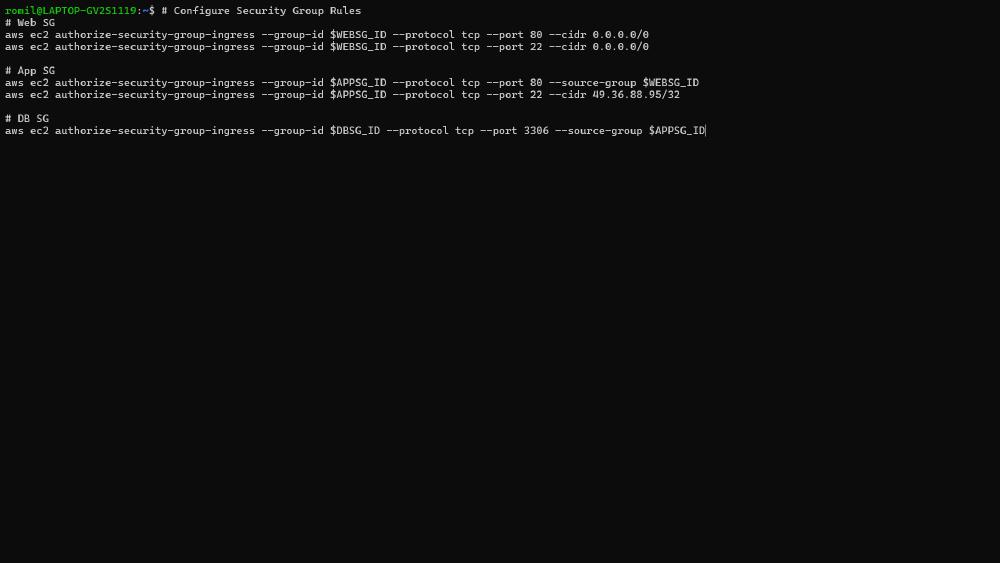
Step 7: Configuring Security Group Rules
# Configure Security Group Rules
# Web SG
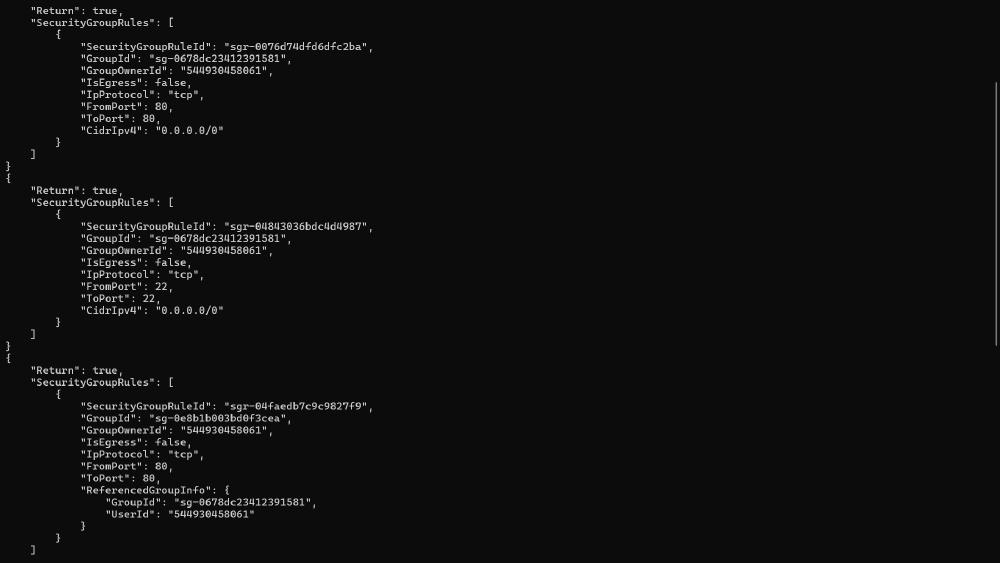
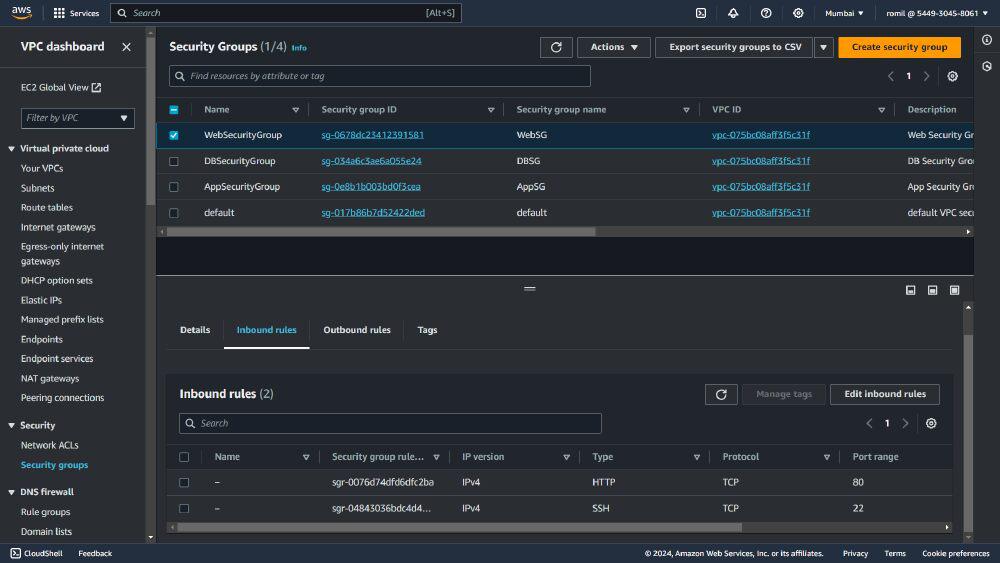
aws ec2 authorize-security-group-ingress --group-id $WEBSG_ID --protocol tcp --port 80 --cidr 0.0.0.0/0
aws ec2 authorize-security-group-ingress --group-id $WEBSG_ID --protocol tcp --port 22 --cidr 0.0.0.0/0

# App SG
aws ec2 authorize-security-group-ingress --group-id $APPSG_ID --protocol tcp --port 80 --source-group $WEBSG_ID
aws ec2 authorize-security-group-ingress --group-id $APPSG_ID --protocol tcp --port 22 --cidr 49.36.88.95/32

# DB SG
aws ec2 authorize-security-group-ingress --group-id $DBSG_ID --protocol tcp --port 3306 --source-group $APPSG_ID
Here security group rules contains main 5 key points
--group-id
--protocol
--port
--cidr
Here port number 80 is stands for HTTP traffic handler and port number 22 is stands for SSH traffic handler.
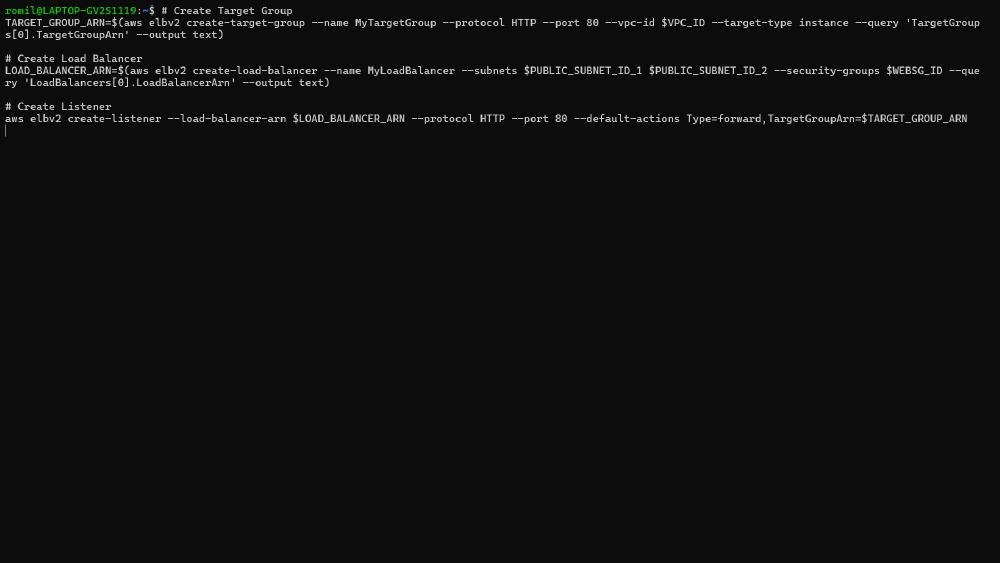
Step 8: Load Balancer Setup
# Create Target Group
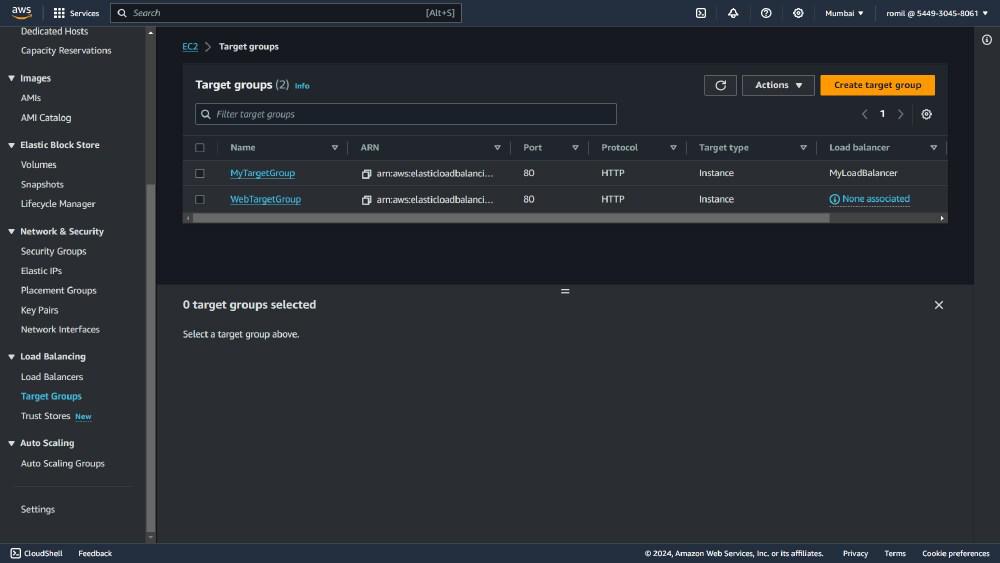
TARGET_GROUP_ARN=$(aws elbv2 create-target-group --name MyTargetGroup --protocol HTTP --port 80 --vpc-id $VPC_ID --target-type instance --query 'TargetGroups[0].TargetGroupArn' --output text)

# Create Load Balancer
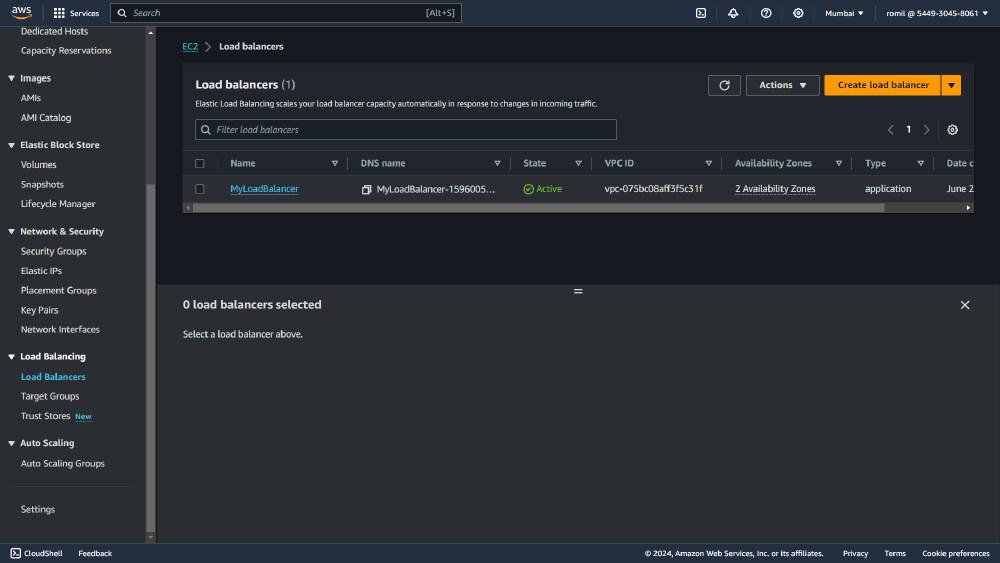
LOAD_BALANCER_ARN=$(aws elbv2 create-load-balancer --name MyLoadBalancer --subnets $PUBLIC_SUBNET_ID_1 $PUBLIC_SUBNET_ID_2 --security-groups $WEBSG_ID --query 'LoadBalancers[0].LoadBalancerArn' --output text)

# Create Listener
aws elbv2 create-listener --load-balancer-arn $LOAD_BALANCER_ARN --protocol HTTP --port 80 --default-actions Type=forward,TargetGroupArn=$TARGET_GROUP_ARN
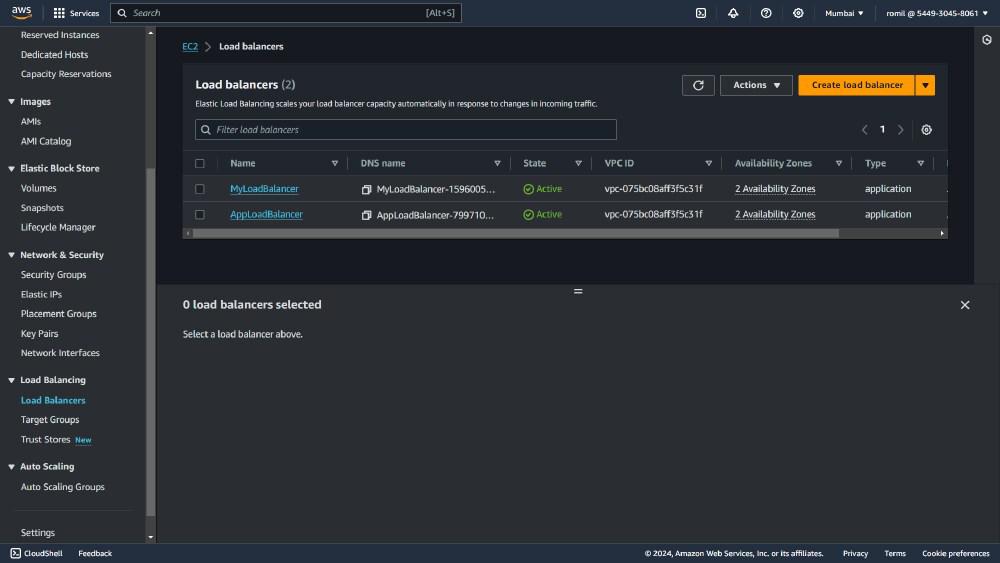
- The following screenshot illustrates on successful ccreation of load balancers:
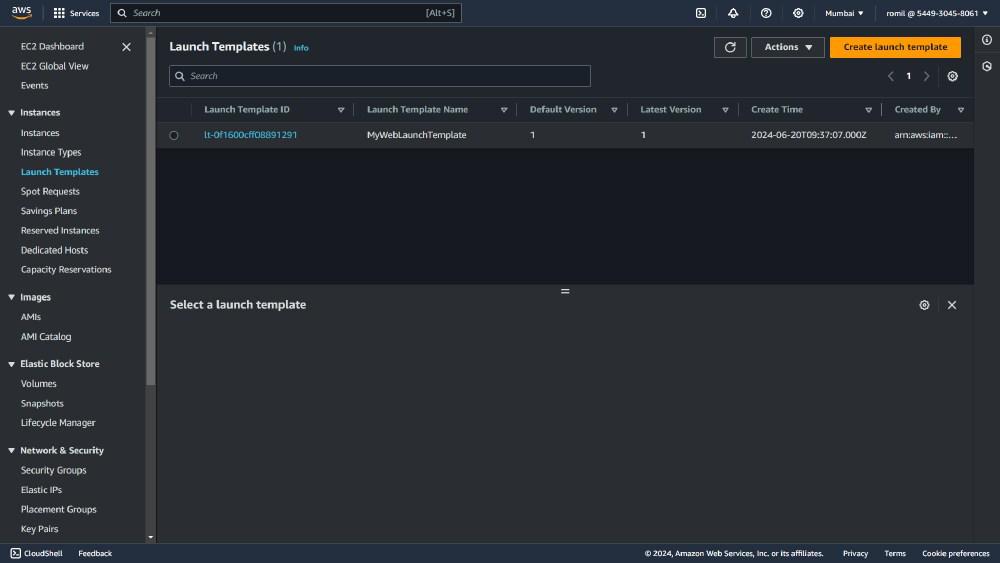
Step 9: Creating Launch Template
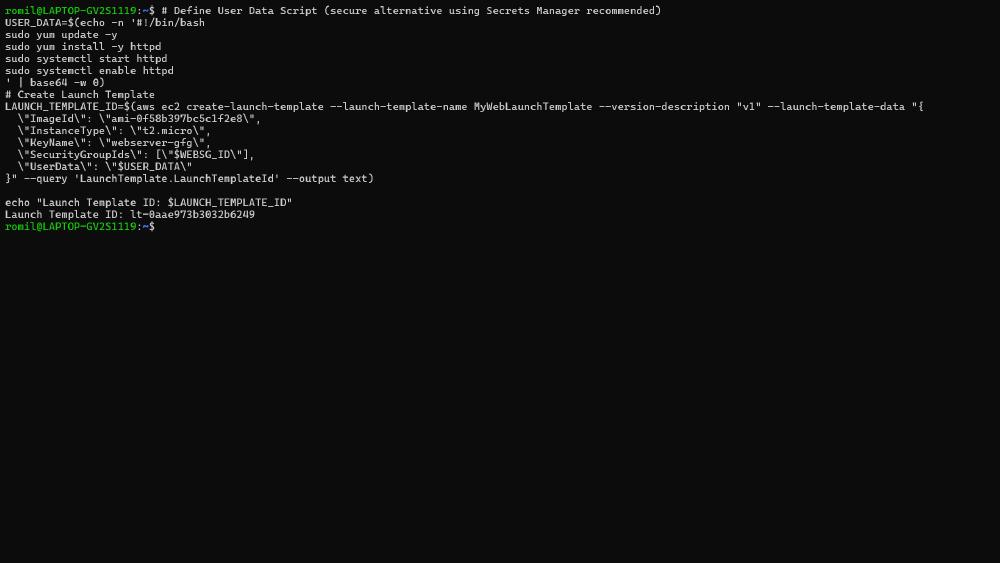
# Define User Data Script (secure alternative using Secrets Manager recommended)
USER_DATA=$(echo -n '#!/bin/bash
sudo yum update -y
sudo yum install -y httpd
sudo systemctl start httpd
sudo systemctl enable httpd
' | base64 -w 0)
# Create Launch Template
LAUNCH_TEMPLATE_ID=$(aws ec2 create-launch-template --launch-template-name MyWebLaunchTemplate --version-description "v1" --launch-template-data "{
  \"ImageId\": \"ami-0f58b397bc5c1f2e8\",
  \"InstanceType\": \"t2.micro\",
  \"KeyName\": \"webserver-gfg\",
  \"SecurityGroupIds\": [\"$WEBSG_ID\"],
  \"UserData\": \"$USER_DATA\"
}" --query 'LaunchTemplate.LaunchTemplateId' --output text)

echo "Launch Template ID: $LAUNCH_TEMPLATE_ID"
- Here you replace "ami-0f58b397bc5c1f2e8" with actual ImageId and "webserver-gfg" with actual your key-pairs.
Step 10: Creating Auto Scaling Group
# Create Auto Scaling Group
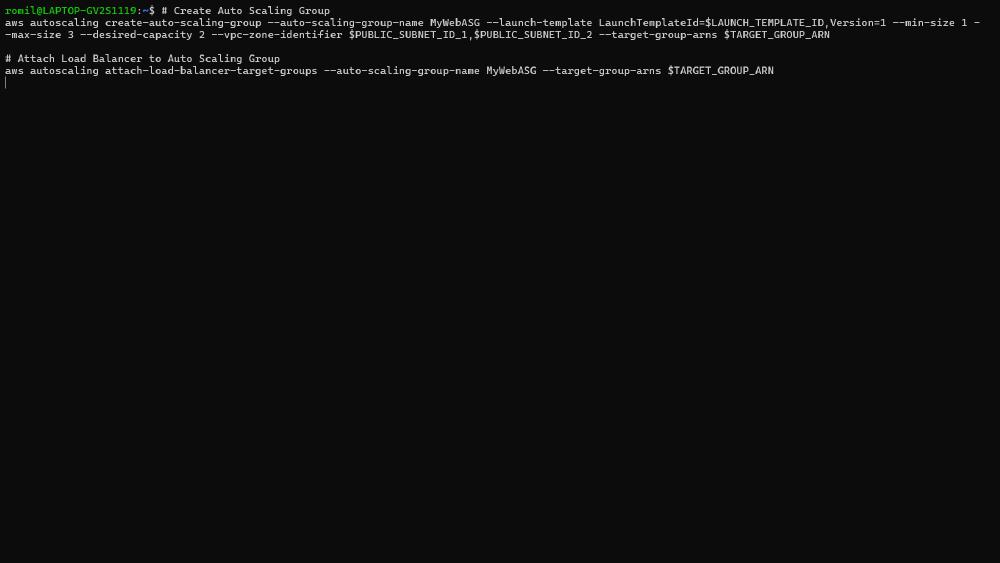
aws autoscaling create-auto-scaling-group --auto-scaling-group-name MyWebASG --launch-template LaunchTemplateId=$LAUNCH_TEMPLATE_ID,Version=1 --min-size 1 --max-size 3 --desired-capacity 2 --vpc-zone-identifier $PUBLIC_SUBNET_ID_1,$PUBLIC_SUBNET_ID_2 --target-group-arns $TARGET_GROUP_ARN

# Attach Load Balancer to Auto Scaling Group
aws autoscaling attach-load-balancer-target-groups --auto-scaling-group-name MyWebASG --target-group-arns $TARGET_GROUP_ARN
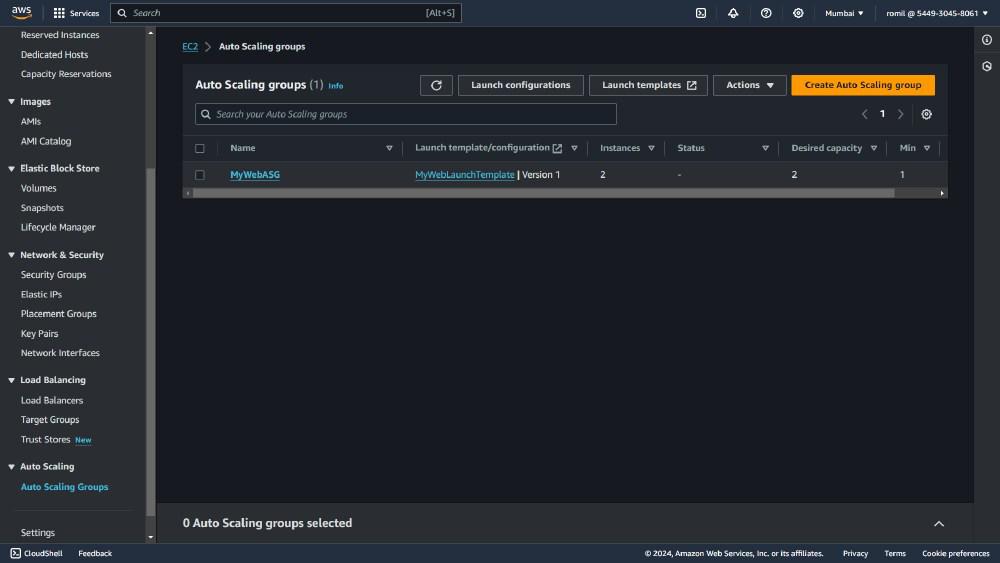
Here we are creating auto scaling group that basically uses the lunchtemplate with maximum and minimum size.
After that we attach load balancer with it.
Application Layer Setup
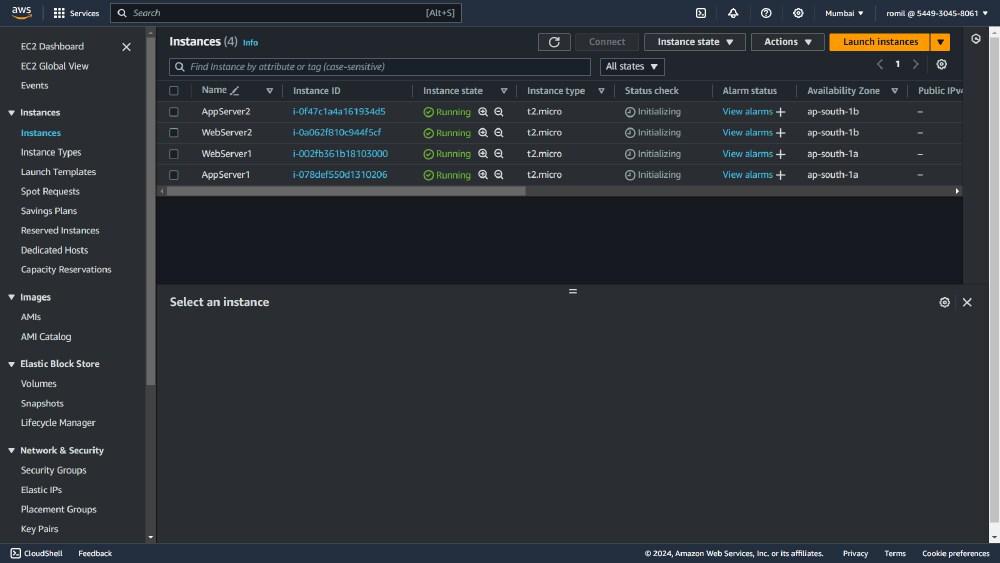
Step 1: Launching EC2 instances
# Launch EC2 Instances for Web Servers
WEB_INSTANCE_ID_1=$(aws ec2 run-instances --image-id ami-0abcdef1234567890 --count 1 --instance-type t2.micro --key-name MyKeyPair --security-group-ids $WEBSG_ID --subnet-id $PUBLIC_SUBNET_ID_1 --associate-public-ip-address --query 'Instances[0].InstanceId' --output text)
aws ec2 create-tags --resources $WEB_INSTANCE_ID_1 --tags Key=Name,Value=WebServer1

WEB_INSTANCE_ID_2=$(aws ec2 run-instances --image-id ami-0abcdef1234567890 --count 1 --instance-type t2.micro --key-name MyKeyPair --security-group-ids $WEBSG_ID --subnet-id $PUBLIC_SUBNET_ID_2 --associate-public-ip-address --query 'Instances[0].InstanceId' --output text)
aws ec2 create-tags --resources $WEB_INSTANCE_ID_2 --tags Key=Name,Value=WebServer2

# Launch EC2 Instances for App Servers
APP_INSTANCE_ID_1=$(aws ec2 run-instances --image-id ami-0abcdef1234567890 --count 1 --instance-type t2.micro --key-name MyKeyPair --security-group-ids $APPSG_ID --subnet-id $PRIVATE_APP_SUBNET_ID_1 --query 'Instances[0].InstanceId' --output text)
aws ec2 create-tags --resources $APP_INSTANCE_ID_1 --tags Key=Name,Value=AppServer1

APP_INSTANCE_ID_2=$(aws ec2 run-instances --image-id ami-0abcdef1234567890 --count 1 --instance-type t2.micro --key-name MyKeyPair --security-group-ids $APPSG_ID --subnet-id $PRIVATE_APP_SUBNET_ID_2 --query 'Instances[0].InstanceId' --output text)
aws ec2 create-tags --resources $APP_INSTANCE_ID_2 --tags Key=Name,Value=AppServer2
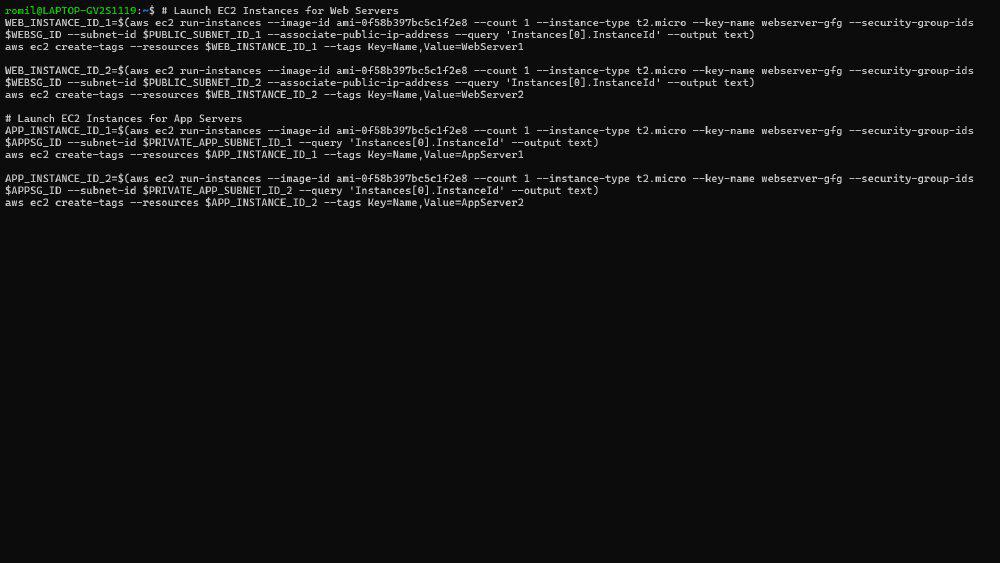
- Here we are launching public web severs for public subnets and private application servers for private subnets.
Whenever we are launching EC2 instance that time we requires main 8 key points
--image-id
--count
--instance-type
--key-name
--security-group-ids
--subnet-id
--query
--output
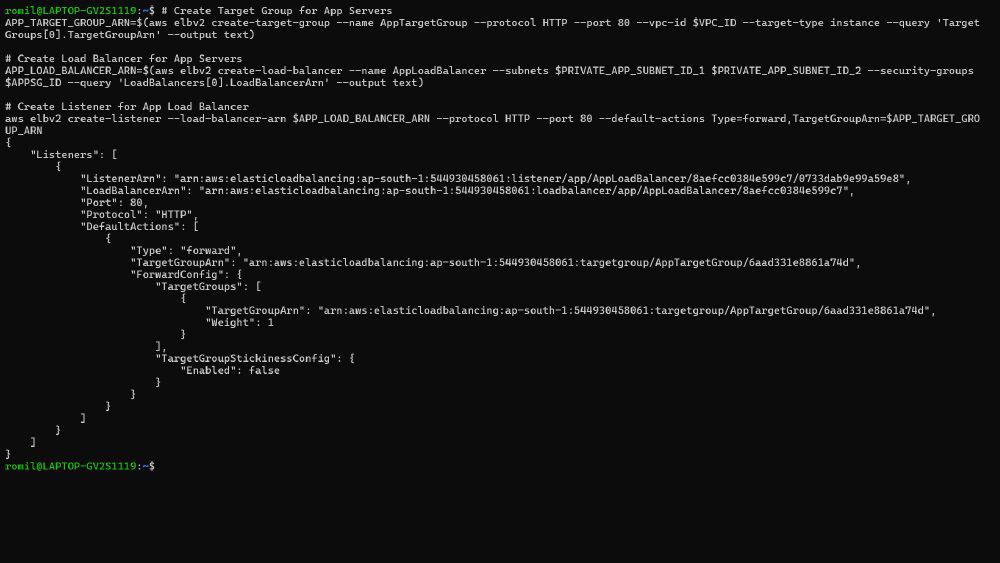
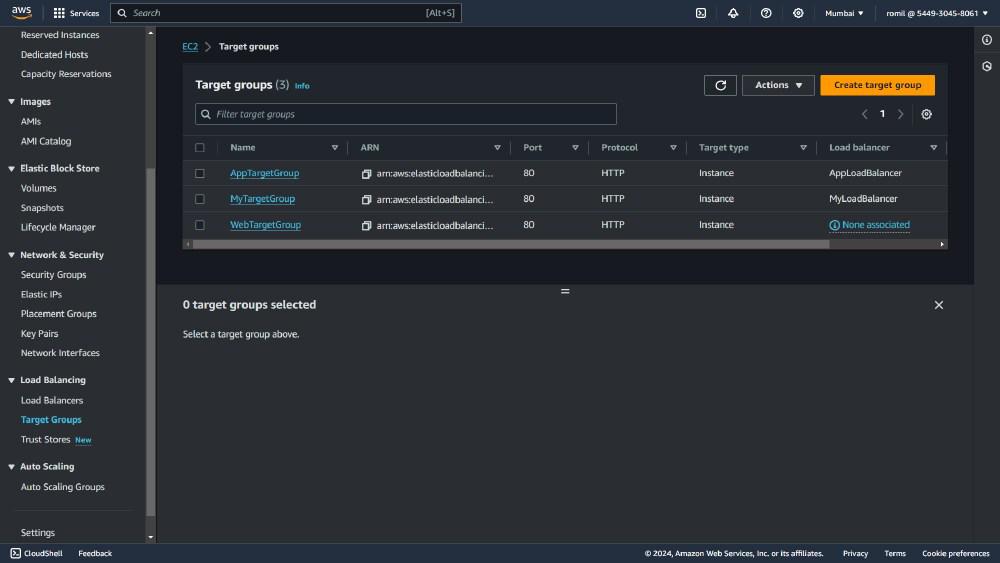
Step 2: Load Balancer Setup
# Create Auto Scaling Group for App Servers
aws autoscaling create-auto-scaling-group --auto-scaling-group-name AppASG --launch-template LaunchTemplateId=$LAUNCH_TEMPLATE_ID,Version=1 --min-size 1 --max-size 3 --desired-capacity 2 --vpc-zone-identifier $PRIVATE_APP_SUBNET_ID_1,$PRIVATE_APP_SUBNET_ID_2 --target-group-arns $APP_TARGET_GROUP_ARN

# Attach Load Balancer to Auto Scaling Group
aws autoscaling attach-load-balancer-target-groups --auto-scaling-group-name AppASG --target-group-arns $APP_TARGET_GROUP_ARN
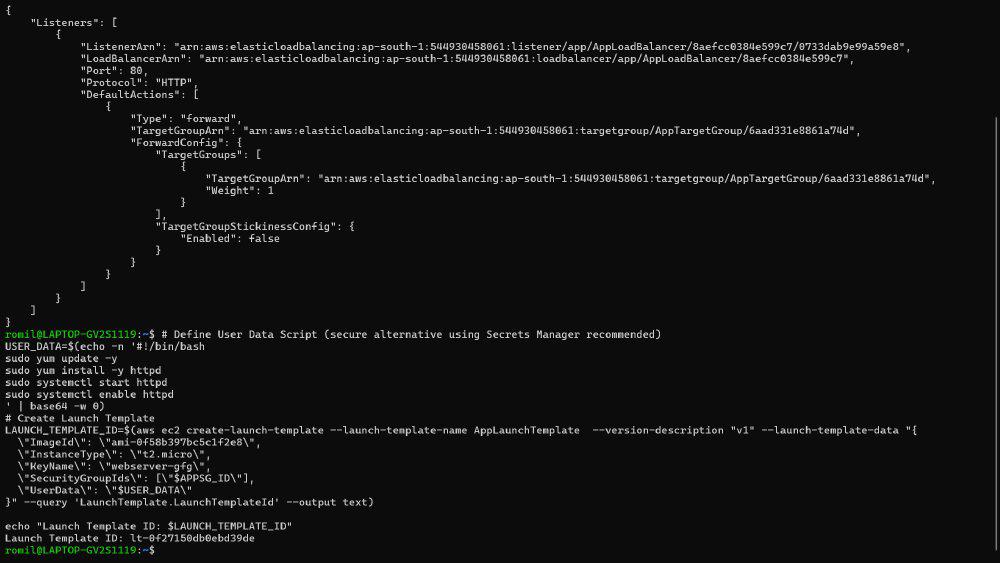
Step 3: Creating Launch Template
# Define User Data Script (secure alternative using Secrets Manager recommended)
USER_DATA=$(echo -n '#!/bin/bash
sudo yum update -y
sudo yum install -y httpd
sudo systemctl start httpd
sudo systemctl enable httpd
' | base64 -w 0)
# Create Launch Template
LAUNCH_TEMPLATE_ID=$(aws ec2 create-launch-template --launch-template-name AppLaunchTemplate  --version-description "v1" --launch-template-data "{
  \"ImageId\": \"ami-0f58b397bc5c1f2e8\",
  \"InstanceType\": \"t2.micro\",
  \"KeyName\": \"webserver-gfg\",
  \"SecurityGroupIds\": [\"$APPSG_ID\"],
  \"UserData\": \"$USER_DATA\"
}" --query 'LaunchTemplate.LaunchTemplateId' --output text)

echo "Launch Template ID: $LAUNCH_TEMPLATE_ID"
- Here you replace "ami-0f58b397bc5c1f2e8" with actual ImageId and "webserver-gfg" with actual your key-pairs.
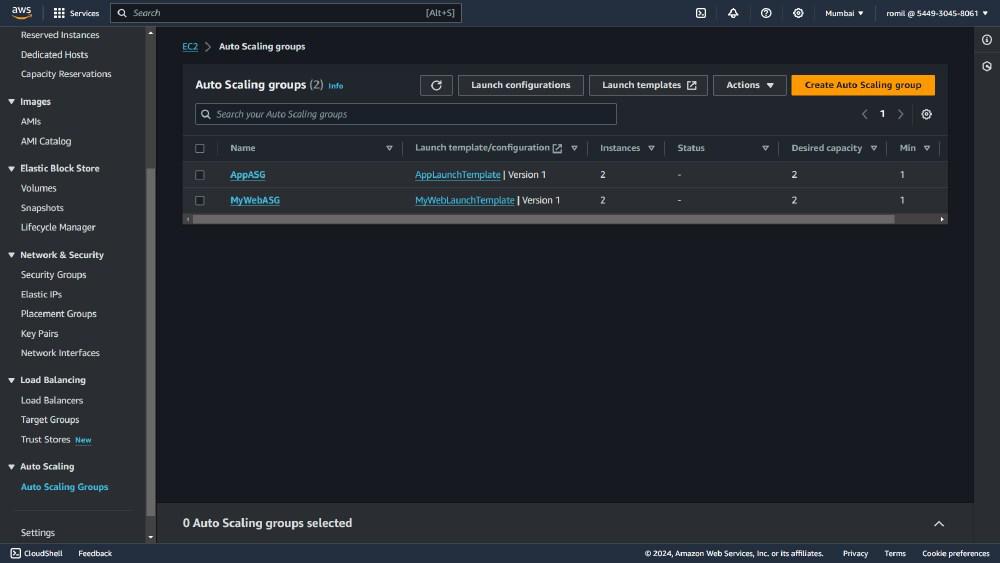
Step 4: Creating Auto Scaling Group
# Create Auto Scaling Group for App Servers
aws autoscaling create-auto-scaling-group --auto-scaling-group-name AppASG --launch-template LaunchTemplateId=$APP_LAUNCH_TEMPLATE_ID,Version=1 --min-size 1 --max-size 3 --desired-capacity 2 --vpc-zone-identifier $PRIVATE_APP_SUBNET_ID_1,$PRIVATE_APP_SUBNET_ID_2 --target-group-arns $APP_TARGET_GROUP_ARN

# Attach Load Balancer to Auto Scaling Group
aws autoscaling attach-load-balancer-target-groups --auto-scaling-group-name AppASG --target-group-arns $APP_TARGET_GROUP_ARN
❖ Data Layer Setup
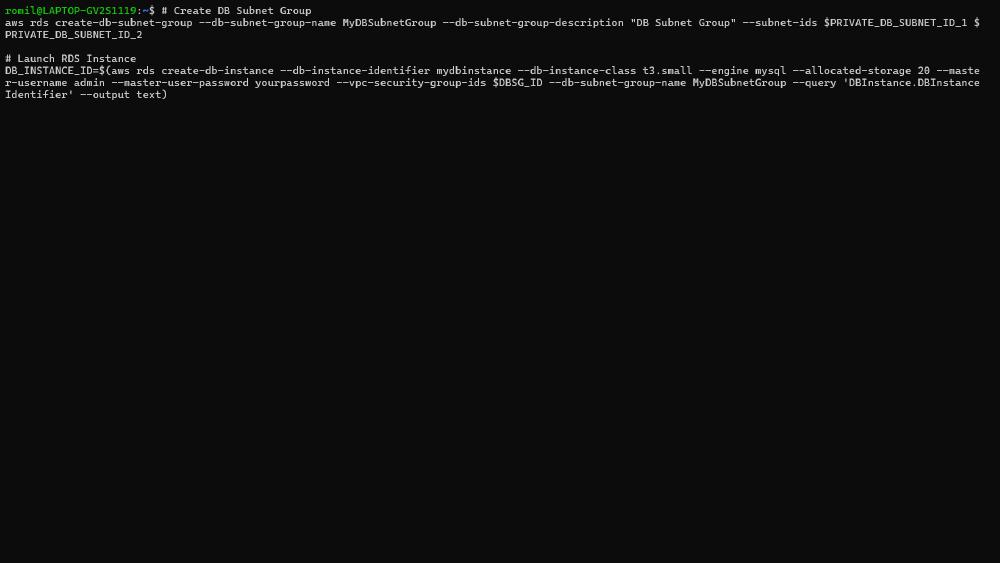
Step 1: Creating database subnet group
# Create DB Subnet Group
aws rds create-db-subnet-group --db-subnet-group-name MyDBSubnetGroup --db-subnet-group-description "DB Subnet Group" --subnet-ids $PRIVATE_DB_SUBNET_ID_1 $PRIVATE_DB_SUBNET_ID_2
Whenever we are creating database subnet group contains main 3 key points
--db-subnet-group-name
--db-subnet-group-description
--subnet-ids
Step 2: Launching RDS instance
# Launch RDS Instance
DB_INSTANCE_ID=$(aws rds create-db-instance --db-instance-identifier mydbinstance --db-instance-class db.t2.micro --engine mysql --allocated-storage 20 --master-username admin --master-user-password yourpassword --vpc-security-group-ids $DBSG_ID --db-subnet-group-name MyDBSubnetGroup --query 'DBInstance.DBInstanceIdentifier' --output text)
Whenever we are Launching RDS instance that contains main 10 key points
--db-instance-identifier
--db-instance-class
--engine
--allocated-storage
--master-username admin
--master-user-password
--vpc-security-group-ids
--db-subnet-group-name
--query
--output
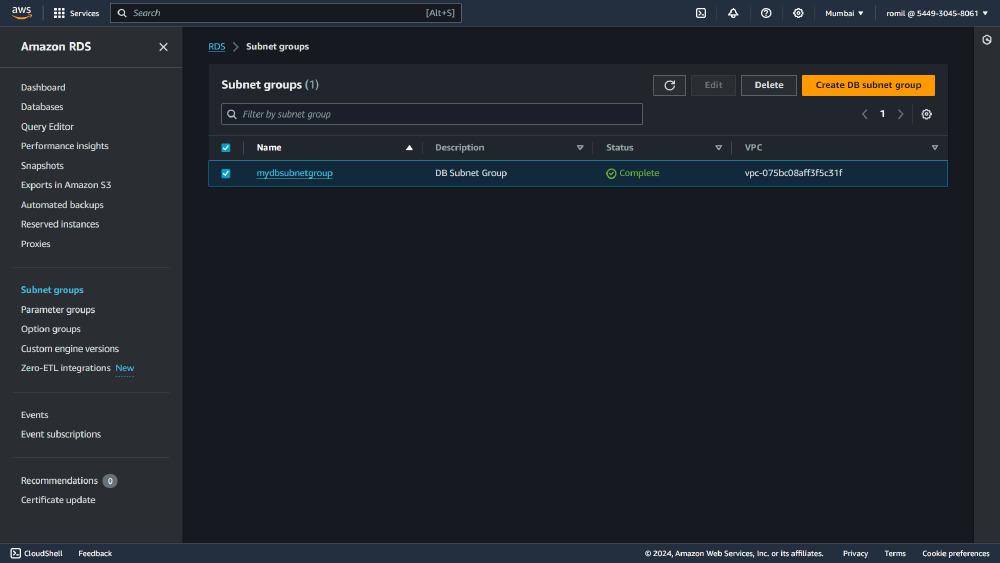
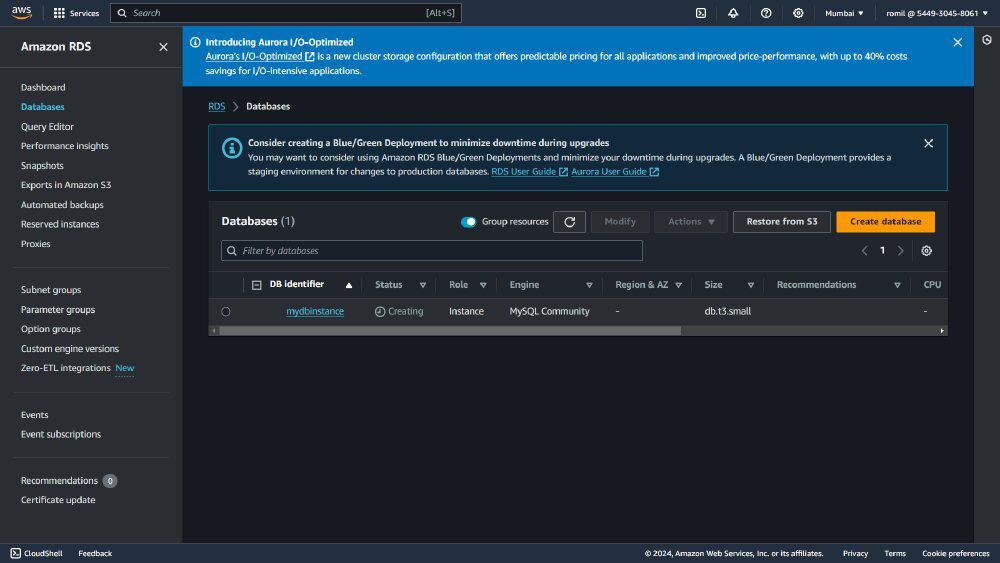
- The following screenshot illustrates on creation subnet:
How much charge it will take after completion of architecture?
It will depends on below factors and your usage.
| Service | Cost |
| VPC | $0 (per hour) |
| Public Subnet (after 1 EIP) | $0.005 (per hour) |
| Security Groups | $0 (per hour) |
| NAT Gateway | $0.045 (per hour) + $0.045 per GB processed |
| EC2 Instances | Varies (on-demand, reserved, spot) |
| RDS Instance | Varies (type, storage, region) |
| Load Balancers | Varies (requests, data processed, hours) |